Goals and Aims
With Foam Fortress: Sydney gearing up, as well as the emergence of the Commando as a very viable Class, it’s about time we started having some proper Shotguns on the field. But you can’t really have a proper shotgun without Absolvers – multiple barrel attachments that allow your blaster to fire a volley of darts at once.
This write-up intends to help the reader construct a six-shot Absolver that will allow blasters like the Triple Shot and the BBUMB to reach 50ft flat (the maximum range for Shotguns in FF:S) with the entire spread.
Inputs and Tools required
- 25-20mm PVC reducer
- 20mm Conduit coupler
- 45cm of 16mm conduit
- Electrical Tape
- Q-bond (Or other superglue)
- Foam blanks or other suitable filler material.
- Hotglue + Hotglue gun
- Ruler
- Marker
- Pipe cutter
- Scissors
- Knife or blade
- A cloth of some sort
Modification Guide
Step 1. The Cradle.
First, you’ll want to start work on the Reducer and the Coupler. The Reducer will act as a cradle of sorts for the three barrels while the Coupler will be used as the attachment point between the blaster and the Absolver itself. The aim here is to nest them into each other with the help of some Electrical Tape.
 Wrap one end of the Coupler in Electrical Tape until it fits snugly into the 20mm section of the Reducer. The amount of tape might take some trial and error, but you’ll get it right eventually. Always apply a little extra, then remove what you don’t need from there.
 Next, you’ll want to nest the two fittings so that they appear flush like in the picture below.
 As you can see, the 20mm conduit Coupler is pretty much flush with the end of the 20mm section of the PVC Reducer.
With the two parts fitted together, we must ensure that they never come apart while you’re using them (It’s pretty important that these things stay together). Grab your superglue and drop some into the gap between the Coupler and Reducer. The electrical tape will create a platform for the glue to actually set on, holding the two pieces together.
 Take note of that small gap visible in this picture. This is where you’ll be wanting to drip the superglue into.
Now that the superglue has cured (It really shouldn’t take any longer than 10 seconds for it to fully set), you can now seal the gap over to prevent any air escaping. Hotglue isn’t my favourite adhesive, but it was quick and easy and it really isn’t holding anything together. So just put some hotglue into and over the gap.
 Now you’ve pretty much completed work on the “Cradle” for now. Next up, the barrels!
Step 2. The Barrels
This type of Absolver only allows for three 16mm conduit barrels. To maximise the performance and capacity of the absolver itself, we will use three 15cm long barrels so that we can load two stock sized darts per barrel for a six dart spread. Measure them out and cut them with a pipe cutter. Don’t forget to ream out one end of each barrel for easier loading and smoother firing.
 Next, we need to tape these barrels together so that they hold their configuration. This way it’ll be much easier to fit all three into the Cradle at once. Apply a couple of wraps of tape at approximately the 7.5cm mark and the 12cm mark of the barrels. Make sure you wrap the tape on the reamed end of the conduit as shown below.
 But before you go shoving your barrels into the Cradle, we need to seal an airhole that will render this whole setup useless. Flip the barrels over to the un-reamed end and you’ll see a sort-of-triangular shaped gap. This hole runs all the way through to the other side and if left there, will allow air to escape. This means no shotgun blast.

Fill it with hotglue. No hole is going to stop us from Shotgun glory. Once the hotglue cures, cut away any excess with a blade.


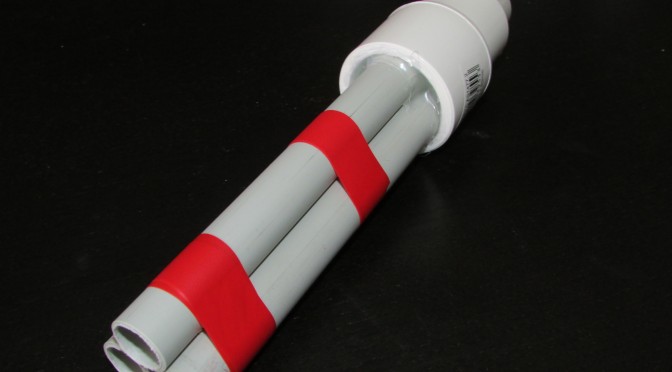
Your barrels are complete. Time to finish this Absolver!
Step 3. Combining the Cradle and the Barrels.
JAM THOSE MOFO’S TOGETHER (make sure you jam the un-reamed ends of the barrels into the cradle, not the other way around!). No seriously, you need to put a tiny bit of muscle into this. It’s a bit of a tight fit so you might need to use a bit of your weight to do it. I put a cloth over the top of the barrels and put the cradle onto my desk, then PUSHED them in. They should “creak” a little until they finally slot into place. Once they stop creaking, check to see that the un-reamed ends of the barrels are sitting almost flush on the end of the 25mm section of the Reducer. It’s hard to illustrate in a picture… mainly because my camera wouldn’t focus on it…
 But this is how it should look once you’ve jammed the parts together.
Now it’s time to fill in some more gaps! As you can see in the picture above, there are some pretty big gaps between the Cradle and the Barrels. These massive gaps will act as passages for air to escape – again meaning no shotgun blast. So we’d better get something in there. Sounds like a job for hotglue! But first…


I used a foam blank cut into quarters and just jammed 3 of those pieces into the holes. You could easily do the same with a stock dart. The reason I did this was to act as a base for the hotglue to sit on while it cured.
With the foam jammed in, it’s time to seal the holes shut with some generous amounts of hotglue. Make sure there are no gaps in the glue anywhere, and also go over the edges where the conduit barrels touch the sides of the Reducer.
 Once the hotglue cures, you’re done! You now have one Absolver to use with your Tripleshot or BBUMB.
Final Thoughts
This “Mod” was fairly simple. It’s more a game of patience than skill in my opinion. Why is it a game of patience? Well because what good is ONE Absolver? You’ll probably need well over TEN to be any sort of effective in a game of Foam Fortress: Sydney. It becomes a matter of whether you can sit there and churn them out one by one until you get enough.
Testing with my BBUMB, there is definitely a fantastic spread and it does indeed reach the 50ft mark. These will make for great pieces of Equipment for the Commando.
Look out for a follow up write up of how to make your blaster compatible with these particular Absolvers.
 Credits
Thanks to Cheyne “Nog” Lambert and Nick “BFG” McKenna for walking me through the design basics of this particular kind of Absolver. Also thanks to Craig “Blastedgnu” Berson and Raymond “Kat” Cheung for some additional information and insight into what materials I should be using and how I should be applying them. And thanks to Psychosis for the provision of the conduit.
Thanks for reading the write up, and I hope to see a few Commandos running around at the next war!
Echoes.