Goals and Aims
Following up on the yesterday’s post detailing how to make an Absolver, I thought it was necessary to write another post on how to modify your blaster to use those Absolvers effectively.
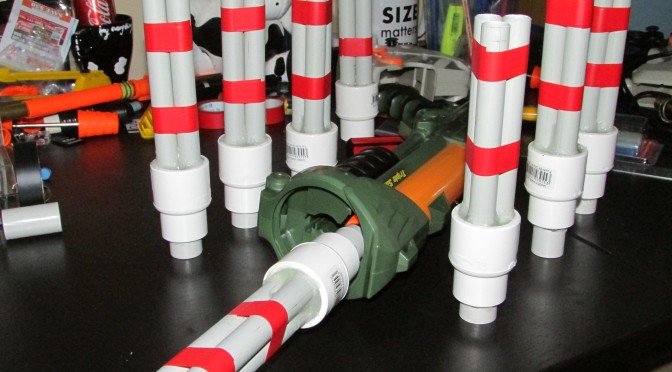
This write-up will use the Tripleshot as an example to show the reader how to make full use of Absolvers.
Inputs and Tools required
- A piece of 20mm conduit (5cm is a good length)
- A Tripleshot Plunger Tube (or even a BBUMB if that’s what you want to use. The same principles of this guide still apply)
- Qbond + Qbond black powder (or other adhesive that can create and airtight seal)
- A Dremel with a grinding bit
- Pipecutters
- Personal Protection Equipment (Eye protection and gloves)
Modification Guide
Take note of the Absolvers: the piece that is intended to attach to the blaster is a 20mm conduit coupler. Logic would tell us that we need some 20mm conduit to attach it to!
Get yourself a piece of 20mm conduit. The first thing you’ll notice is that it does not fit over the lip of the TS plunger tube  or over the end of the black pipe on the BBUMB. The only solution is to grind down the inside of the conduit until it fits. Use your Dremel and grinding bit to get the job done. Be sure not to grind it down too much though, you want a good friction fit (The piece of conduit shouldn’t fall off if you let it go).
 This is what it should look like when it’s done. Keep in mind that the Conduit is flush with the surface of the plunger tube.
 The piece of conduit looks a bit long now, doesn’t it? This would create deadspace and deadspace isn’t good for your blasters. So get your pipe cutters and cut the piece of conduit down to about 3cm. I found this to be the best length to use that balances amount of deadspace and ease of loading and removing the Absolvers.
Now you need to secure the conduit to the plunger tube. I used Qbond and the black powder that acts as a filler and sealer. You could easily use epoxy or something, but if you’re going to use an alternative, make sure it’s a good adhesive. You want this to stick.
 Be generous with securing the conduit – this piece is going to be pulled and twisted and tugged quite often considering what it’s for. Mine ended up looking like this.
 With that done, you can now reassemble your TS (or BBUMB)! Do note, with the TS, I used a 13kg Spring nested in a stock Longshot spring. That will give you the 50ft you want.
Now you have a working Shotgun to use as a Commando!
Final Thoughts
This modification was even easier than making the Absolvers themselves. Most Nerfers will have no trouble following this guide.
From my experience, the loading is very smooth and quite easy. Commandos will be a force with this sort of blaster at their side.
 To end this guide, here’s a test firing video of my Shotgun. Enjoy!
Echoes.